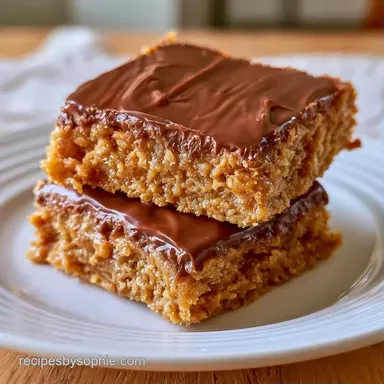
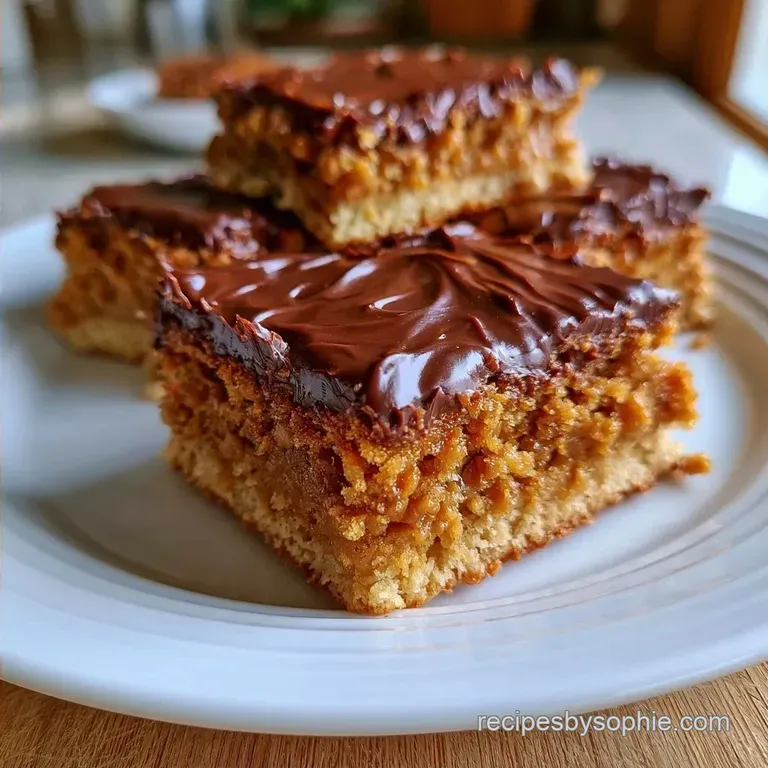
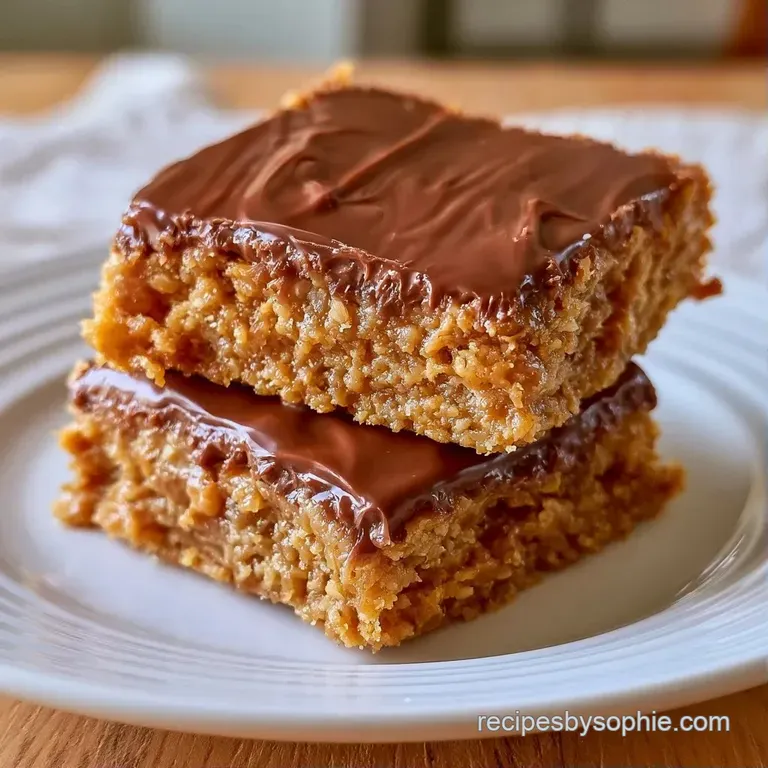
Ultra-Fast No Bake Peanut Butter Bars
- Time: 10 min active + 1 hour chilling
- Flavor/Texture Hook: Fudgy, salty sweet, and dense
- Perfect for: Last minute parties or easy snack prep
Forget everything you've heard about needing a crust for these. Most people think you need crushed graham crackers or oats to keep a bar from falling apart, but that's just not true. You can get a dense, fudge like consistency using only peanut butter and butter.
I remember the first time I tried skipping the crust. I was convinced it would stay a puddle in the pan, but the fridge does all the heavy lifting here. Once those fats chill, they lock together.
You can expect a treat that's heavy on the peanut butter and just sweet enough. These No Bake Peanut Butter Bars aren't light, but they satisfy a craving in about ten minutes of actual work.
No Bake Peanut Butter Bars
Right then, let's look at why this actually works without a stove. It comes down to how the ingredients bond when they cool.
Fat Stability: The melted butter and peanut butter create a structure that firms up in the fridge, acting as the "glue" for the sugar. Sugar Binding: Powdered sugar dissolves into the fats, which prevents the bars from feeling grainy.
Since we're skipping the bake, the texture differs from a traditional brownie.
| Feature | Fast No Bake | Classic Baked |
|---|---|---|
| Prep Time | 10 minutes | 20+ minutes |
| Texture | Fudgy and dense | Cakey or chewy |
| Setting | Requires chilling | Requires cooling |
Ingredient Deep Dive
You don't need a huge arsenal for this. Most of these are probably in your pantry right now.
| Ingredient | What It Does | Best Swap |
|---|---|---|
| Creamy Peanut Butter | Main structure and flavor | Almond butter (adds nuttiness) |
| Unsalted Butter | Provides richness and set | Coconut oil (makes it softer) |
| Powdered Sugar | Sweetens and binds | Finely ground cane sugar |
| Chocolate Chips | Creates the top layer | Dark chocolate chunks |
For the Base
The 255g of peanut butter does the heavy lifting. Using a creamy version is key because chunks of nuts will make the base lumpy.
For the Topping
The addition of 2 tablespoons of peanut butter to the chocolate chips is the trick here. It stops the chocolate from cracking when you slice the bars.
Tools You Will Need
Keep it simple. You only need a few basic things to get this done.
- 8x8 inch baking pan
- Parchment paper
- Medium mixing bowl
- Microwave safe glass bowl
- Spatula or spoon
Chef's Note: Use a glass bowl for the chocolate. Plastic can sometimes hold onto heat unevenly and scorch the chips.
How to Put Them Together
Let's get into it. This is a very quick process, so have everything measured out first.
- Line your 8x8 inch pan with parchment paper. Leave some overhang on the sides so you can lift the whole block out later.
- Stir the 115g melted butter and 255g peanut butter in a medium bowl until the mixture is completely smooth.
- Fold in 200g powdered sugar, 5ml vanilla extract, and 1.5g salt. Mix until a thick, cohesive dough forms.
- Press the peanut butter mixture firmly into the bottom of the pan. Use the back of a spoon to make it even.
- Put 255g semi sweet chocolate chips and 32g peanut butter in a microwave safe glass bowl.
- Microwave on high for 30 seconds, then stir. Continue in 15 second bursts until the glaze looks glossy and smooth.
- Pour the chocolate over the base. Spread it to the edges with a spatula.
- Refrigerate for at least 1 hour. Wait until the topping feels firm to the touch.
- Lift the bars out using the paper. Slice into 20 equal squares with a sharp knife.
Fixing Common Texture Issues
Even with a simple recipe, things can go sideways. Usually, it's a temperature issue.
Why Your Base Is Soft
If the base feels like paste, you might have used too much butter or your peanut butter was too oily. According to King Arthur Baking, ratios in no bake desserts are sensitive to temperature. If your kitchen is hot, the butter stays soft.
Why Your Chocolate Separated
This happens when the chocolate overheats and the fats split. It looks grainy or has oil streaks on top. You can usually fix this by stirring in a tiny bit of warm peanut butter to bring it back together.
| Problem | Root Cause | Solution |
|---|---|---|
| Base is too oily | PB was overly stirred/separated | Chill the base for 30 extra mins |
| Chocolate is grainy | Overcooked in microwave | Stir in 1 tsp warm peanut butter |
| Bars won't slice clean | Chocolate is too cold/hard | Dip knife in hot water between cuts |
Customizing Your Batch
You can easily tweak these to fit your mood. If you want a version with a crunch, you could look at my Chocolate Bars with Crust recipe for more inspiration.
Adjusting the Size
If you're making a smaller batch, use a loaf pan. For a half batch, reduce the time in the fridge by about 20% since there's less mass to cool. If you go 2x or 3x, work in batches for the chocolate topping. Don't try to melt a massive amount of chocolate in one go or the edges will burn before the center melts.
Flavor Twists
- Add Crunch: Stir in a handful of crushed pretzels to the peanut butter base.
- Salted Top: Sprinkle flaky sea salt over the wet chocolate before chilling.
- Nut Swap: For a different vibe, try a Bake Peanut Butter Pie recipe style filling if you prefer something lighter.
Diet Swaps
- dairy free: Use a vegan butter substitute. It works just as well for the set.
- Less Sweet: Use 70% dark chocolate chips for the topping to cut through the sugar.
Storage and Freshness Tips
These stay good for a while, but they definitely need to stay cold.
Fridge: Keep them in an airtight container for up to 7 days. They actually get a bit fudgier after a day in the fridge. Freezer: You can freeze these for up to 3 months. Wrap the block in foil and parchment. Just thaw a slice in the fridge for an hour before eating.
Zero Waste: If you have leftover peanut butter in the bowl, don't wash it out with water. Scrape it into a smoothie or spread it on a piece of toast. If you have a few chocolate drips on the parchment paper, just eat them.
What to Serve With These
Since these are very rich, you need something to balance the heaviness.
- Fresh Fruit: Slices of Granny Smith apple or fresh raspberries cut through the fat.
- Drinks: A cold glass of almond milk or a strong black coffee works best.
- Contrast: Serve them alongside some salty popcorn for a movie night spread.
Trust me, don't overthink these. They are meant to be a quick, satisfying treat. Just follow the chilling time, and you'll have a great result. Enjoy your No Bake Peanut Butter Bars!
Recipe FAQs
How long do no bake peanut butter bars last?
Up to 7 days in the fridge. Keep them in an airtight container to maintain freshness. They actually develop a fudgier texture after chilling for a day.
How do you make these peanut butter bars?
Stir melted butter and peanut butter until smooth. Fold in powdered sugar, vanilla, and salt, then press the mixture into a parchment lined pan. Top with a microwaved blend of chocolate chips and peanut butter, then refrigerate for one hour.
Is it true you have to bake these for the topping to set?
No, this is a common misconception. The chocolate topping sets completely through refrigeration for at least one hour. No heat is needed after the initial microwave melt.
Can these be frozen?
Yes, for up to 3 months. Wrap the block in foil and parchment paper. Simply thaw a slice in the fridge for an hour before eating.
How do you prevent the chocolate topping from seizing?
Microwave in 15-second intervals. Stir the mixture after each burst to ensure the chocolate melts evenly and remains glossy.
What's a great dessert for Valentine's Day?
These no-bake bars are a perfect choice. Their rich flavor profile is ideal for the holiday. If you want something more decadent, our rich chocolate brownies are also a fantastic option.
How do you get clean slices?
Use a sharp knife after full refrigeration. Lift the bars out of the pan using the parchment paper overhang and slice them into 20 equal squares.
No Bake Peanut Butter Bars