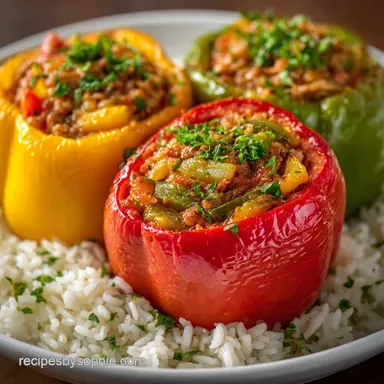
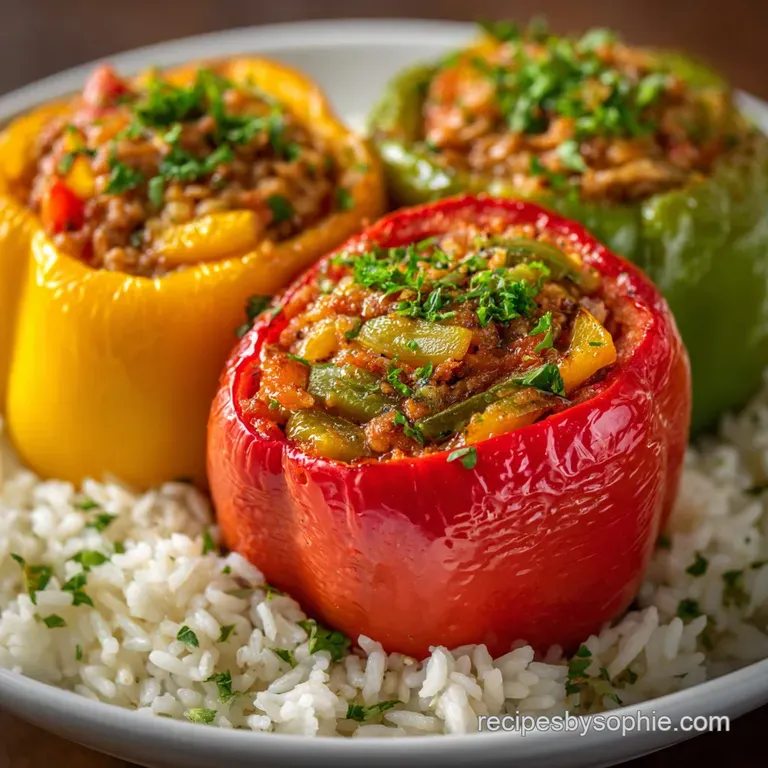
Old Fashioned Ground Beef Stuffed Peppers
- Time: 20 min active + 40 min cook = Total 60 mins
- Flavor/Texture Hook: Velvety cheese topping with a tender, savory beef filling
- Perfect for: Weeknight dinner or budget-friendly meal prep
Easy Beef and Rice Stuffed Peppers
That sharp, satisfying sizzle of ground beef hitting a hot skillet is where the magic starts. There is nothing quite like the aroma of garlic and oregano filling the kitchen, signaling that a comforting meal is on the way. For me, this dish always brings back memories of Sunday dinners, though my early attempts were...
Well, a disaster.
The biggest headache with this dish is the "texture lottery." I used to put raw peppers in the oven, only to find the filling was cooked but the pepper walls were still hard and raw. Or, I'd overcook them until they turned into a mushy, collapsed mess.
It's a frustrating balance that usually leaves you with a meal that feels incomplete.
But we've fixed that. By using a specific pre cook method for the shells and pre cooked rice for the filling, these Stuffed Peppers come out consistent every time. You get a tender vegetable shell, a savory, seasoned center, and a bubbling, golden cheese crust that holds everything together.
Why This Method Wins
I've spent way too much time figuring out why some versions of this dish feel like a chore to eat. It usually comes down to moisture management and timing. Here is the logic behind the steps:
- The Parboil Effect: Simmering the peppers for a few minutes breaks down the tough cellulose in the walls. This ensures they finish cooking at the exact same time as the cheese melts.
- Rice Hydration: Using pre cooked rice prevents the filling from sucking all the moisture out of the meat. It keeps the inside velvety rather than dry and crumbly.
- Sauce Insulation: Placing the peppers in a bed of tomato sauce creates a steam chamber. This protects the bottom of the peppers from scorching while they roast.
- Fat Distribution: Browning the beef first creates those deep, savory notes, while the addition of olive oil in the parboil adds a subtle richness to the pepper skin.
The difference between a "good" and a "great" version of this meal is all in the timing. If you rush the beef or skip the simmer, you're just eating a salad with meat inside.
| Approach | Prep Time | Pepper Texture | Best For |
|---|---|---|---|
| Classic Oven | 20 mins | Tender & Structured | Family Dinners |
| Raw Roast | 10 mins | Often undercooked | Quick (but risky) |
| Slow Cooker | 15 mins | Very soft/mushy | Set and forget |
Right then, let's look at what actually goes into the pot to make this work.
Core Component Analysis
Not every ingredient is just there for flavor. Some do the heavy lifting to make sure the structure holds up during the bake.
| Ingredient | Science Role | Pro Secret |
|---|---|---|
| Bell Peppers | Structural Vessel | Use thick walled peppers to prevent collapsing |
| Lean Ground Beef | Protein Base | Drain excess fat so the filling isn't greasy |
| Tomato Sauce | Moisture Barrier | Use a pinch of sugar if the sauce is too acidic |
| Mozzarella | Binding Agent | Use low moisture cheese for a better brown |
It is important to remember that the rice acts as a binder here. Without it, the meat would just shrink and leave a huge gap between the filling and the pepper wall.
The Ingredient List
Since we're keeping this budget smart, I've chosen ingredients that are easy to find at any local grocery store. Trust me on this: don't bother with the most expensive organic peppers; the standard ones work perfectly here.
- 6 large bell peppers Why this? Large size allows for more filling and better stability
- 1 tbsp olive oil Why this? Adds a smooth finish to the parboiled skins
- 2 cups water Why this? Used for the initial softening simmer
- 1 lb lean ground beef Why this? Prevents the filling from becoming an oily mess
- 2 cups cooked white rice Why this? Ensures the filling is moist and fully cooked
- 1 medium onion, finely diced Why this? Adds sweetness and aromatic depth
- 3 cloves garlic, minced Why this? Essential for that punchy, savory flavor
- 1 tsp salt Why this? Basic flavor enhancer for the beef
- 1/2 tsp black pepper Why this? Adds a subtle, warm heat
- 1 tsp dried oregano Why this? Gives it that classic herbal, savory vibe
- 1/4 cup fresh parsley, chopped Why this? Brightens the heavy flavors of beef and cheese
- 1 1/2 cups tomato sauce Why this? Provides moisture and a tangy contrast
- 1 cup shredded mozzarella cheese Why this? For that stretchy, bubbling golden top
- 1/4 cup grated Parmesan cheese Why this? Adds a salty, nutty complexity
If you're looking for a different take, you might enjoy a bell pepper recipe that varies the seasoning slightly.
| Original Ingredient | Substitute | Why It Works |
|---|---|---|
| White Rice (2 cups) | Brown Rice (2 cups) | Similar structure. Note: Nuttier flavor, slightly chewier |
| Ground Beef (1 lb) | Ground Turkey (1 lb) | Similar protein. Note: Leaner, needs more salt/seasoning |
| Mozzarella (1 cup) | Monterey Jack (1 cup) | Similar melt. Note: Milder flavor, very creamy |
| Bell Peppers (6) | Poblano Peppers (6) | Similar shape. Note: Adds a mild, smoky heat |
I once tried using cauliflower rice to make it "healthy," and while it worked, the filling lacked that satisfying chew. If you go that route, add an extra 1/4 cup of cheese to help bind the loose cauliflower.
Step by step Guide
Let's crack on. Make sure your oven is preheating while you prep the filling so everything stays on schedule.
- Slice the tops off the bell peppers and remove the seeds. Note: Keep the tops if you want them for presentation
- Place peppers in a skillet with water and olive oil; simmer for 3-5 minutes until slightly softened, then drain.
- In a large skillet over medium high heat, brown the lean ground beef and diced onion until no pink remains.
- Stir in minced garlic, salt, black pepper, and dried oregano, cooking for 60 seconds until the garlic smells fragrant.
- Remove the mixture from heat and stir in the cooked rice and chopped fresh parsley in a mixing bowl.
- Preheat oven to 375°F (190°C) and pour half of the tomato sauce into the bottom of a 9x13 inch baking dish.
- Firmly pack the beef and rice mixture into each parboiled pepper. Note: Don't overstuff or the tops will mushroom over
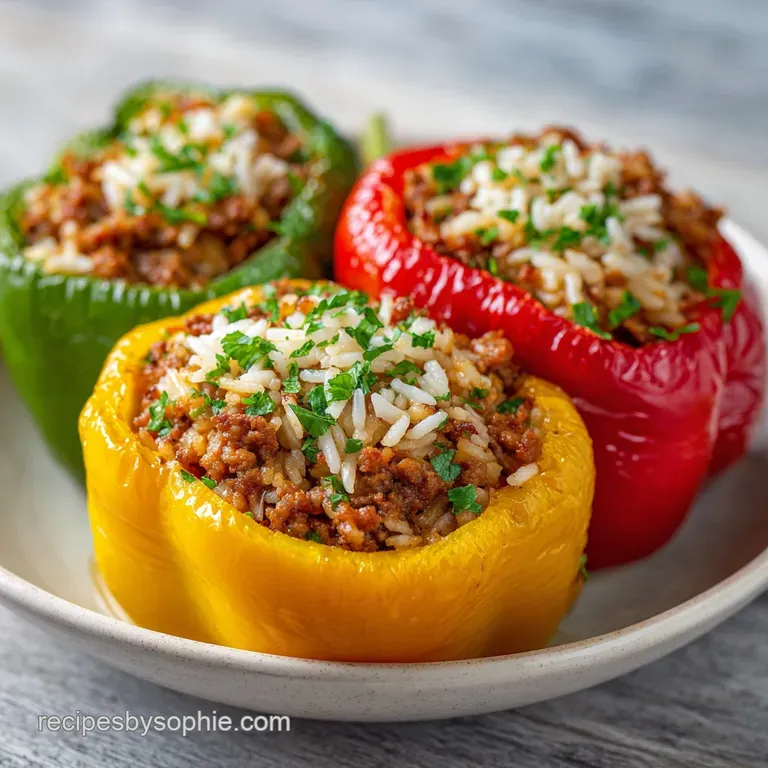
- Top each pepper with the remaining tomato sauce and a handful of shredded mozzarella and Parmesan cheese.
- Bake for 20-25 minutes until the cheese is bubbling and edges are golden brown.
Chef's Tip: For a deeper flavor, add a teaspoon of Worcestershire sauce to the beef while browning. It adds a hidden "umami" layer that makes people wonder why your Stuffed Peppers taste like they came from a restaurant.
Solving Common Issues
Even with a solid plan, things can go sideways. Usually, it's a matter of heat distribution or ingredient ratios.
Troubleshooting Common Issues
| Issue | Solution |
|---|---|
| Why Your Peppers Are Still Firm | If you find the walls are still a bit crunchy, you likely skipped the parboiling or didn't simmer them long enough. The oven's dry heat isn't always enough to soften the pepper before the cheese burns |
| Why Your Filling Falls Out | This happens when the filling is too wet or wasn't packed tightly enough. Make sure your cooked rice is well drained and press the meat mixture down with a spoon. |
| Why The Cheese Burned | If your cheese is blackened but the peppers feel raw, your oven might be running hot. Try moving the rack to the lower third of the oven or loosely covering the dish with foil for the first 10 minutes |
Mistakes Checklist:
- ✓ Did you parboil the peppers for at least 3 minutes?
- ✓ Is the rice pre cooked and not raw?
- ✓ Did you drain the beef fat before adding the rice?
- ✓ Is the oven truly at 375°F?
- ✓ Did you use a 9x13 dish to prevent overcrowding?
Customizing Your Meal
One of the best things about Stuffed Peppers is how flexible they are. You can lean into different regional flavors without changing the core technique.
If you want a more Italian vibe, try these Italian Stuffed Peppers with Ground Beef by adding a pinch of red pepper flakes to the beef and swapping the oregano for a mix of basil and parsley. It transforms the dish into something that feels like a baked pasta meal.
For those looking for Healthy Ground Beef Stuffed Peppers, you can swap the white rice for quinoa. Quinoa has a similar texture but adds more protein and fiber. Just make sure the quinoa is fully cooked and cooled before mixing it with the beef.
If you're craving Old Fashioned Stuffed Bell Peppers, skip the mozzarella and use a sharp cheddar cheese. The bolder flavor of cheddar pairs beautifully with the sweetness of the roasted bell pepper. You can also add a bit of diced celery to the onion mix for that traditional "mirepoix" base.
For a vegetarian version, swap the beef for a mix of lentils and crumbled tofu. Use a bit more soy sauce or tamari to mimic the savory depth of the meat. I've found that adding smoked paprika to the lentil mix helps recreate that "browned" flavor.
If you love this style of comfort food, you should definitely try the beef and rice version for a slightly different ratio of ingredients.
Adjusting The Yield
Cooking for two is different than cooking for a crowd. Here is how to pivot.
Scaling Down (for 2-3 people): Use a smaller baking dish (like an 8x8) so the sauce doesn't spread too thin and evaporate. Reduce the baking time by about 5-10 minutes since there's less thermal mass in the oven.
If the recipe calls for an egg in a variation, beat it in a cup first and use half.
Scaling Up (for 12+ people): Work in batches for browning the beef; if you crowd the pan, the meat will steam instead of sear. Increase the salt and spices to only 1.5x the original amount spices often intensify when scaled up.
Use two 9x13 dishes and rotate them halfway through the bake to ensure even browning.
Baking Larger Batches: If you're filling a massive roasting pan, lower the temperature to 350°F (175°C) and extend the time by 10-15 minutes. This prevents the edges from burning before the center is hot.
Pepper Myths
There are a few things people believe about this dish that just aren't true. Let's clear them up.
Myth: Raw rice cooks inside the pepper. Many recipes suggest using raw rice, but unless you add a massive amount of liquid and cover the dish tightly, the rice often stays hard or "chalky" in the center. Pre cooking the rice is the only way to guarantee a velvety texture.
Myth: Searing the peppers "seals" the flavor. Some people suggest searing the outside of the pepper in a pan first. While it adds a bit of char, it doesn't actually "seal" anything. Parboiling is far more effective for achieving a consistent, tender bite.
Myth: You must use only red peppers. While red is classic, green peppers provide a more bitter, earthy contrast that some people prefer. Yellow and orange are the sweetest. Mix and match for a colorful platter.
Storage And Leftovers
These Stuffed Peppers actually hold up remarkably well, making them a top tier choice for meal prep.
In the Fridge: Store them in an airtight container for up to 4 days. To keep them from getting soggy, let them cool completely before putting the lid on. This prevents condensation from dripping onto the cheese.
In the Freezer: You can freeze these for up to 3 months. I recommend freezing them without the cheese topping. Once thawed, add fresh cheese and bake. This prevents the cheese from becoming grainy or separating during the freeze thaw cycle.
Reheating Tips: The oven is best. Pop them back in at 350°F (175°C) for about 15 minutes. If you're in a rush, a microwave works, but the pepper walls can get a bit rubbery.
To fix this, add a tablespoon of water to the plate and cover it with a damp paper towel to create steam.
Zero Waste Tips: Don't throw away the pepper tops! You can chop them up and add them to the beef mixture for extra flavor. Any leftover tomato sauce from the bottom of the pan can be reduced in a small pot and used as a dip for crusty bread the next morning.
What To Serve Beside
Since Stuffed Peppers are quite hearty, you want sides that provide a fresh, acidic contrast to cut through the richness of the beef and cheese.
The Fresh Balance: A simple arugula salad with a lemon vinaigrette is a brilliant pairing. The peppery greens and the acidity of the lemon brighten the whole meal. Alternatively, a sliced cucumber salad with rice vinegar and sesame seeds adds a cool, crisp element.
The Comfort Duo: If you're going all in on comfort, a side of garlic mashed potatoes or a buttery piece of sourdough bread is the way to go. The bread is especially useful for soaking up that extra tomato sauce from the bottom of the baking dish.
The Green Side: Steamed broccoli or roasted asparagus provides the necessary nutrients and a bit of a "snap" that contrasts the softness of the peppers. Toss them in a bit of olive oil and salt, and roast them on a separate tray at the same temperature as the peppers for a coordinated meal.
Recipe FAQs
Can I stuff peppers with raw ground beef?
No, brown the meat first. Cooking the lean ground beef and onion in a skillet ensures the meat is fully cooked and flavor developed before baking.
Should you boil peppers before stuffing them?
Yes, parboil them briefly. Simmer the peppers in water and olive oil for 3-5 minutes so they are slightly softened and don't remain crunchy after baking.
What do you fill stuffed peppers with?
A savory mix of beef and rice. Combine browned lean ground beef, onion, garlic, salt, black pepper, dried oregano, cooked white rice, and fresh parsley.
How to cook stuffed peppers in an oven?
Preheat your oven to 375°F (190°C). Pour half the tomato sauce into a 9x13 inch baking dish, pack the peppers with filling, top with remaining sauce and cheese, and bake for 20-25 minutes.
What are some common mistakes when making stuffed peppers?
Skipping the parboiling step or under packing the filling. Neglecting the simmer leads to tough pepper walls, while loose filling often falls out during the baking process.
Why are my stuffed peppers still firm after baking?
You likely skipped the simmering step. The oven's dry heat is often insufficient to soften the pepper walls before the cheese on top begins to burn.
How do I store and reheat stuffed peppers?
Store in an airtight container in the fridge for up to 4 days. Let them cool completely before sealing to prevent condensation from making the cheese soggy.
Ground Beef Stuffed Peppers