Old Fashioned Stuffed Bell Peppers: Velvety and Cheesy

- Time:15 minutes active + 45 minutes baking = Total 1 hour
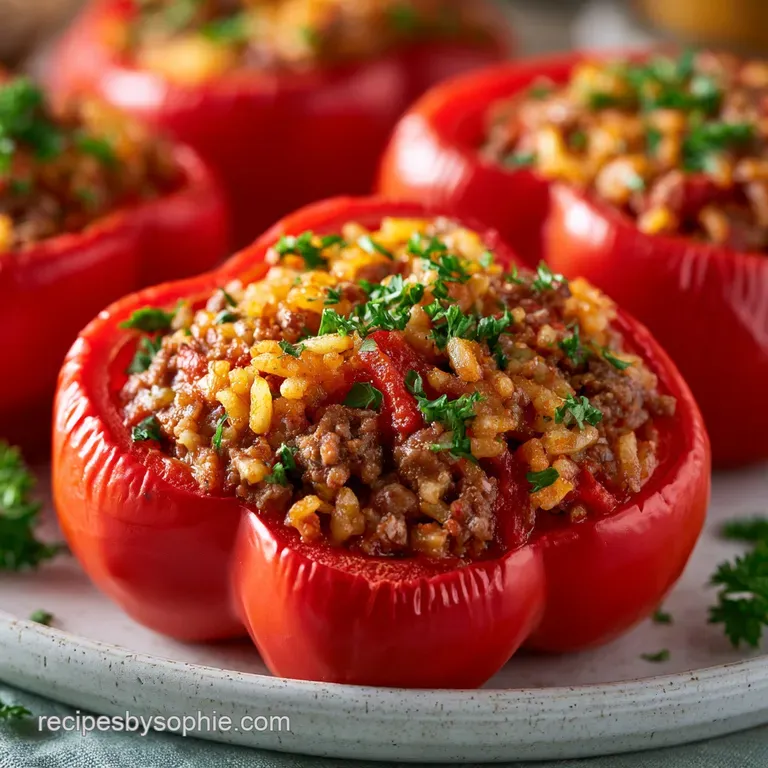
- Flavor/Texture Hook: Blistered skins with a velvety, cheesy center
- Perfect for: Budget-friendly weeknight dinner or meal prep
Stuffed Peppers
The loud sizzle of lean beef hitting a hot skillet is where the magic starts. I remember the first time I tried making these, I followed a recipe that told me to use raw rice. I ended up with peppers that were basically charred on the outside and filled with crunchy, undercooked grains.
It was a disaster, and I almost gave up on the whole concept.
But here is the truth that most recipes ignore: you don't need to struggle with raw rice timings. Using pre cooked brown rice changes everything. It ensures the filling is consistent and lets the pepper do the work of steaming. You'll get that rich, savory profile without the guesswork.
This approach makes Stuffed Peppers a reliable staple. We are focusing on a budget smart build here, using simple pantry ingredients to create something that feels like a feast. You can expect a meal that is hearty, colorful, and actually stays together when you plate it.
The Big Pepper Myth
Right then, let's talk about the biggest lie in the kitchen: the raw rice myth. Many people think putting raw rice in the filling is the "authentic" way, but it's a gamble. If your rice is too dry, it sucks all the moisture out of the meat. If the pepper is too thick, the rice stays hard.
By using cooked brown rice, we control the hydration. The rice absorbs the tomato sauce and the beef juices during the bake, rather than fighting for moisture. This means your Stuffed Peppers will have a cohesive, velvety texture every single time.
Also, don't fall for the "pre roasting" trap. Some people tell you to bake the empty peppers for 20 minutes before filling them. While that works, it's an unnecessary step if you use a bit of water in the pan.
The steam does the heavy lifting, leaving you with a pepper that is tender but still has a bit of a bite.
The Steam Pocket Trick: Adding water to the bottom of the baking dish creates a sealed chamber of steam. This cooks the pepper walls from the bottom up while the oven heat hits them from the top.
Starch Absorption Dynamics: Cooked brown rice has more structural integrity than white rice. It holds onto the Worcestershire and tomato sauce without turning into mush.
The Cheese Shield: Adding the cheese at the very end prevents it from burning while the peppers are still softening. It creates a bubbly, golden cap that locks in the moisture.
| Method | Prep Time | Texture | Best For |
|---|---|---|---|
| Raw Rice (Classic) | 15 minutes | Varied/Grainy | Traditionalists |
| Cooked Rice (Fast) | 15 minutes | Velvety/Uniform | Weeknight Meals |
Component Analysis
I've found that the balance of fat and acid is what makes this dish work. Since we are using lean beef, the tomato sauce provides the necessary lubrication so the filling doesn't feel dry.
| Ingredient | Science Role | Pro Secret |
|---|---|---|
| Bell Peppers | Structural Vessel | Use wide bottom peppers so they stand upright |
| Brown Rice | Texture Base | Under cook the rice slightly before stuffing |
| Lean Beef | Protein/Umami | Brown it deeply for a richer base flavor |
| Tomato Sauce | Hydration/Acid | Stir in a pinch of sugar if the sauce is too tart |
Gathering Your Essentials
Stick to these measurements for the best result. I've tweaked these over time to make sure the filling doesn't overflow or collapse.
- 6 large bell peppers (approx. 900g) Why this? Large ones hold more filling and stay juicy
- 1/2 cup water Why this? Creates the steam bath
- 1 lb lean ground beef (93% lean) Why this? Prevents excess grease from pooling
- 2 cups cooked brown rice (370g) Why this? Adds earthy flavor and fiber
- 1 medium yellow onion, finely diced (150g) Why this? Provides a sweet, aromatic base
- 3 cloves garlic, minced (15g) Why this? Essential for that punchy depth
- 1 tsp dried oregano Why this? Adds a classic herbal note
- 1 tsp smoked paprika Why this? Gives a subtle wood fired taste
- 1/2 tsp salt Why this? Enhances all other flavors
- 1/4 tsp black pepper Why this? Basic heat and sharpness
- 1 cup low sodium tomato sauce Why this? Binds the filling together
- 1 tbsp Worcestershire sauce Why this? Deepens the beefy umami
- 1 cup shredded sharp cheddar cheese (115g) Why this? Bold flavor that cuts through the rice
Substitution Guide
| Original Ingredient | Substitute | Why It Works |
|---|---|---|
| Lean Beef (1 lb) | Ground Turkey (1 lb) | Similar profile. Note: Turkey is leaner, so add 1 tbsp olive oil |
| Brown Rice (2 cups) | Quinoa (2 cups) | High protein. Note: Result is slightly nuttier and softer |
| Sharp Cheddar | Pepper Jack | Adds a spicy kick. Note: Melts similarly to cheddar |
| Bell Peppers | Poblano Peppers | Earthier taste. Note: Slightly spicier and thinner walls |
Trust me on this, don't bother with low-fat cheese. You need the fat for that golden, bubbly crust that makes these Stuffed Peppers look like they came from a restaurant.
Equipment Needed
You don't need any fancy gadgets here, just a few basics. A sturdy skillet is key for the beef, and a 9x13 inch baking dish is the standard. If you have a meat thermometer, it's a nice to have, but not mandatory.
I usually use a stainless steel skillet because it gives the beef a better sear. If you're using non stick, just make sure your heat is high enough to get some color on the meat. For the peppers, a sharp paring knife makes removing the seeds much easier.
From Prep to Plate
Let's crack on with the actual cooking. I've broken this down into phases so you can organize your workspace.
Phase 1: Preparing the Vessels
- Carefully slice the tops off the bell peppers and remove the seeds and membranes, smoothing out any jagged edges. Note: This ensures the filling goes in easily without gaps
Phase 2: Building the Filling
- Brown the lean beef in a skillet over medium high heat until no longer pink and slightly browned.
- Add the diced onion and garlic to the skillet, sautéing until the onions are translucent.
- Stir in the cooked brown rice, dried oregano, smoked paprika, salt, and black pepper. Note: Toasting the spices with the rice briefly wakes up the oils
- Fold in half of the tomato sauce and the Worcestershire sauce until the mixture is well combined.
Phase 3: The Bake
- Preheat the oven to 375°F (190°C).
- Stand the peppers upright in a 9x13 inch baking dish and pour the water into the bottom of the pan. Note: This is the steam secret
- Spoon the beef and rice filling generously into each pepper, pressing down slightly.
- Top each pepper with a dollop of the remaining tomato sauce and a sprinkle of shredded cheese.
- Cover the dish with foil and bake for 30 minutes.
- Remove the foil and bake for an additional 15 minutes until the cheese is bubbly and pepper skins are slightly blistered.
Chef's Note: If you want a deeper flavor, add a teaspoon of espresso powder to the beef. It doesn't taste like coffee, but it makes the meat taste "darker" and more savory.
Avoiding Kitchen Disasters
The most common issue I see with Stuffed Peppers is the texture mismatch, where the filling is done but the pepper is still raw, or vice versa. This usually comes down to the pepper size or the oven's heat distribution.
Troubleshooting Common Issues
| Issue | Solution |
|---|---|
| Why Your Peppers Stay Hard | If you pull your dish out and the peppers are still crunchy, it's usually because the foil seal wasn't tight enough. The steam escaped, and the peppers essentially dry baked. Make sure the foil is cri |
| Why Your Filling Is Dry | Dry filling happens when you overcook the beef during the browning phase or use too little tomato sauce. The cooked rice acts as a sponge, so if there isn't enough sauce, it will suck the moisture out |
| Why Your Cheese Burns | This happens if you leave the foil on for too long or take it off too early. Stick to the 30 minute covered / 15 minute uncovered split. |
Common Mistakes Checklist
- ✓ Did you add water to the pan? (Crucial for tenderness)
- ✓ Is the beef browned, not just grey? (For flavor)
- ✓ Did you use pre cooked rice? (To avoid raw grains)
- ✓ Is the foil sealed tightly? (To trap steam)
- ✓ Did you leave the cheese for the last 15 minutes? (To prevent burning)
Dietary Adaptations
If you're looking for something a bit different, these Stuffed Peppers are incredibly flexible. For a leaner version, you can swap the beef for ground turkey. If you're doing that, I recommend adding a tablespoon of olive oil to the pan, as turkey can be a bit too dry.
For those wanting a Ground Beef Stuffed Peppers recipe option, replace the beef with cooked lentils or crumbled tempeh. You might need to add a bit more smoked paprika to maintain that savory depth.
If you're going low carb, swap the brown rice for cauliflower rice. Just be careful: cauliflower rice releases a lot of water, so sauté it in the pan for 3-5 minutes to cook off the excess moisture before mixing it with the sauce.
Decision Shortcut
- If you want more spice, use Pepper Jack and add diced jalapeños to the filling.
- If you want a smokier taste, double the smoked paprika.
- If you're feeding a crowd, follow the scaling rules below.
Scaling for Crowds
When you're making a larger batch of Stuffed Peppers, you can't just multiply everything and hope for the best. The physics of the oven change when the pan is crowded.
Scaling Down (1/2 Batch) Use an 8x8 inch square pan instead of the 9x13. Reduce the baking time by about 5-10 minutes since there is less thermal mass in the oven. Be careful not to overcook the peppers.
Scaling Up (2x Batch) Use two 9x13 inch pans. Don't double the salt and spices exactly, as they can become overpowering; go with about 1.5x the spices. Lower the oven temperature to 350°F (180°C) and extend the baking time by 10-15 minutes.
This ensures the centers are cooked through without burning the outer peppers.
| Scale | Pan Size | Temp Adjustment | Time Adjustment |
|---|---|---|---|
| 1/2 Batch | 8x8 inch | Same | -5 to 10 mins |
| 2x Batch | 2x 9x13 inch | -25°F (10°C) | +10 to 15 mins |
Pepper Truths
There are a few things people believe about this dish that just aren't true. Let's clear them up so you can cook with confidence.
One big myth is that you have to use red peppers for the best flavor. While red peppers are sweeter, green peppers provide a more "savory" and slightly bitter contrast that actually pairs better with the sharp cheddar. Use whatever color you have on hand.
Another misconception is that searing the peppers before stuffing them "locks in the flavor." It doesn't. Searing adds a charred taste, but it doesn't affect the interior flavor. The steam bake method is far more efficient for getting a velvety texture.
Finally, some say you must use white rice for a "classic" feel. In reality, brown rice provides a much needed chew and nuttiness that prevents the Stuffed Peppers from feeling like a pile of mush.
Storage Guidelines
These are fantastic for meal prep because they actually taste better the next day once the flavors have had time to meld.
Fridge Storage Place the cooled Stuffed Peppers in an airtight container. They'll stay fresh for 3-4 days. If the cheese has hardened, a quick sprinkle of water on top before reheating will help it loosen up.
Freezing Instructions You can freeze these, but I recommend freezing them before adding the cheese. Wrap each pepper individually in foil and place them in a freezer bag. They'll last for up to 3 months.
To cook from frozen, thaw in the fridge overnight and bake as usual, adding the cheese in the last 15 minutes.
Zero Waste Tips Don't throw away the pepper tops and seeds! You can toss the tops into a freezer bag and use them when making a vegetable stock. The seeds can be cleaned and toasted in a pan with a bit of oil and salt for a crunchy, spicy snack.
What to Serve This With
Since Stuffed Peppers are a complete meal with protein, carbs, and veg, you don't need much on the side. But if you want to round it out, a light, acidic side is the way to go.
A crisp garden salad with a lemon vinaigrette cuts through the richness of the beef and cheese. Alternatively, some steamed broccoli or a side of corn on the cob works great for a family style dinner.
If you're looking for other ideas, you might like my Peppers with Ground Beef recipe variation for a slightly different sauce profile.
Right then, you're all set. Just remember: trust the steam, use cooked rice, and don't be afraid to let those pepper skins blister. It's all part of the charm. Happy cooking!
Recipe FAQs
What's usually in stuffed peppers?
Lean ground beef, cooked brown rice, and aromatic vegetables. This recipe combines beef with onion, garlic, tomato sauce, and sharp cheddar cheese.
Should peppers be cooked before stuffing?
No, it's not necessary. The peppers soften and cook through during the 45-minute baking process in the oven.
How to cook stuffed peppers in an oven?
Preheat the oven to 375°F (190°C). Bake the stuffed peppers covered with foil for 30 minutes, then uncover for 15 minutes until the cheese is bubbly.
Why are my stuffed peppers still hard after baking?
The foil seal was likely not tight enough. If the steam escapes, the peppers dry bake instead of steaming, leaving them crunchy.
Why is the filling in my stuffed peppers dry?
The beef was overcooked during browning or too little tomato sauce was used. Because brown rice absorbs moisture, sufficient sauce is required to keep the filling tender.
Can I freeze stuffed peppers for later?
Yes, but freeze them before adding the cheese. Wrap each pepper individually in foil and store them in a freezer bag for up to 3 months.
How to store and reheat leftover stuffed peppers?
Keep them in an airtight container in the fridge for 3-4 days. Sprinkle a small amount of water on the cheese before reheating to help it loosen up.
Classic Stuffed Peppers

