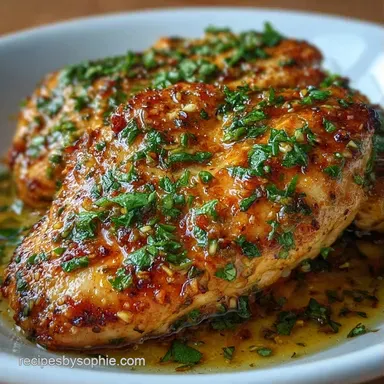
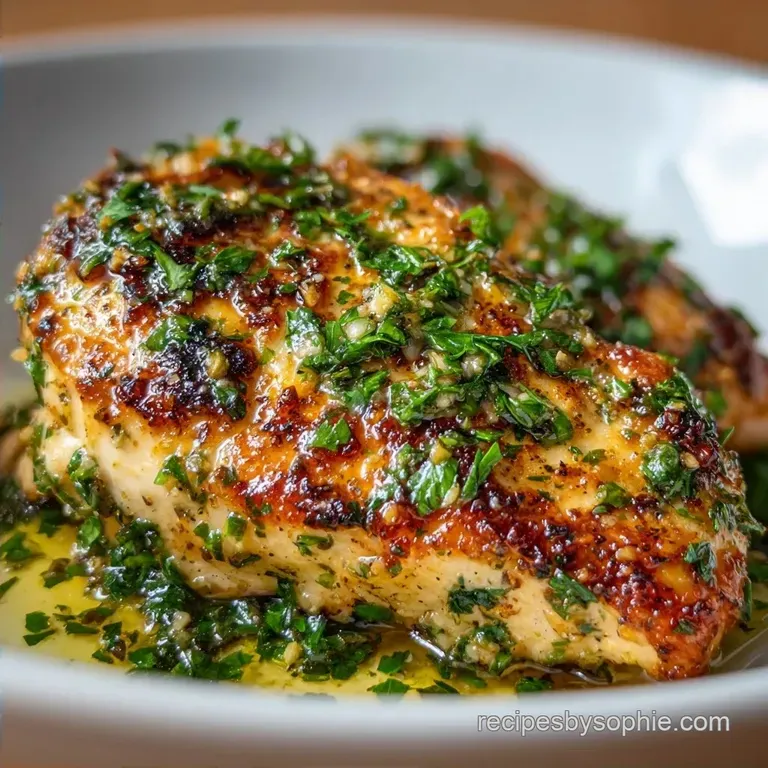
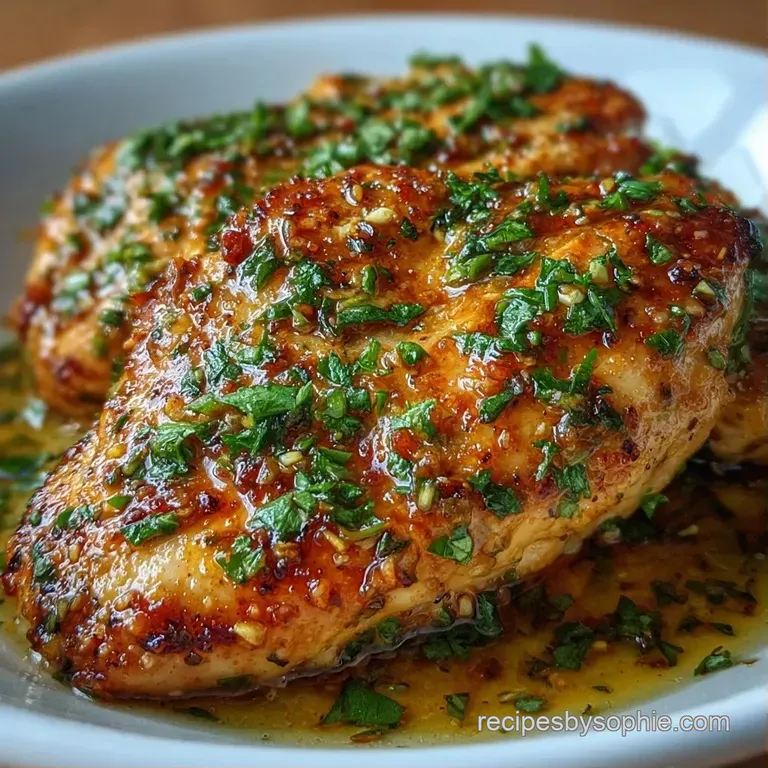
Tender Garlic Chicken Breast: Juicy and Golden
- Time: 10 min active + 20 min cook
- Flavor/Texture Hook: Velvety butter with a mahogany gold crust
- Perfect for: Easy weeknight dinner or meal prep
- Making the Best Tender Garlic Chicken Breast
- The Secret to Juicy Meat
- Breaking Down the Flavor Profile
- Gathering Your Kitchen Gear
- The Essential Tools List
- The Step-by-Step Cooking Flow
- Avoiding Common Cooking Mistakes
- Customizing Your Garlic Chicken
- Adjusting for More Guests
- Debunking Chicken Cooking Myths
- Fresh Storage and Zero Waste
- Serving and Plating Ideas
- Critical Sodium Level
- Recipe FAQs
- 📝 Recipe Card
Making the Best Tender Garlic Chicken Breast
Hear that? It's the sound of butter hitting a hot cast iron skillet, that sudden, aggressive sizzle that tells you the crust is about to form. There is nothing quite like the smell of minced garlic and paprika hitting the heat, filling the kitchen with an aroma that practically pulls people into the room by their noses.
For a long time, I struggled with the "rubber eraser" effect. You know exactly what I mean - when the thin end of the breast is basically charcoal, but the thick part is still barely warm. It's the classic chicken breast trap. I used to just hope for the best, but hope isn't a cooking technique.
That's where this recipe comes in. By focusing on uniform thickness and a protective butter barrier, we've turned a tricky protein into something that's consistently velvety and juicy. This Tender Garlic Chicken Breast isn't about fancy gear, it's about a few simple mechanical fixes that change the entire outcome.
The Secret to Juicy Meat
Right then, let's talk about why this actually works. Most people just throw a breast in the oven and pray. We're doing things differently to ensure we don't end up with dry meat.
Uniform Thickness: Pounding the meat means the heat reaches the center of the breast at the same time it hits the edges, stopping the outer layers from overcooking.
Fat Barrier: The butter rub creates a shield that keeps the internal juices from evaporating during the over high heat roast.
Controlled Heat: A 400°F (200°C) oven is the sweet spot where the butter browns before the meat fibers tighten up and squeeze out their moisture.
The Rest Period: Letting the meat sit allows the fibers to relax and reabsorb the juices, so they don't all run out onto the plate the second you cut into it.
| Method | Time | Texture | Best For |
|---|---|---|---|
| Oven Baked | 20 mins | Velvety, consistent | Meal prep, easy cleanup |
| Stovetop | 15 mins | Crispy, charred | Quick cravings, high sear |
| Slow Cooker | 4 hours | Shredded, soft | Set and forget meals |
Breaking Down the Flavor Profile
I've found that the magic is in the ratio of the rub. If you use too much garlic, it turns bitter; too little, and it's just buttered chicken.
| Ingredient | Science Role | Pro Secret |
|---|---|---|
| Unsalted Butter | Moisture Lock | Use softened, not melted, for a thicker paste |
| Minced Garlic | Aromatic Base | Mince by hand for a more uneven, rustic texture |
| Paprika | Color/Depth | Use smoked paprika for a wood fired taste |
| Salt | Protein Binder | Salt early to help the butter adhere better |
Gathering Your Kitchen Gear
Don't overthink the ingredients. We're using a few staples, but the quality of the butter makes a huge difference here. Honestly, don't even bother with low-fat butter; you need the fat for the texture.
- 4 boneless, skinless chicken breasts (approx. 1.5 lbs / 680g) Why this? Standard size for even cooking
- 4 tbsp (57g) unsalted butter, softened Why this? Creates the velvety rub
- 4 cloves (12g) garlic, minced fine Why this? Sharp, pungent flavor punch
- 1 tsp (2g) paprika Why this? Gives that mahogany gold color
- 1 tsp (6g) salt Why this? Essential for flavor penetration
- 1/2 tsp (1g) black pepper Why this? Adds a subtle, warm bite
- 1 tbsp (4g) fresh parsley, chopped Why this? Brightens the heavy butter flavor
- 1 tbsp (15ml) olive oil Why this? Prevents sticking in the pan
Quick Swaps for Your Pantry
| Original Ingredient | Substitute | Why It Works |
|---|---|---|
| Unsalted Butter | Ghee (clarified butter) | Higher smoke point. Note: More intense nutty flavor |
| Paprika | Garlic Powder (extra) | Maintains savory profile. Note: Loses the deep red color |
| Fresh Parsley | Dried Oregano | Adds earthy, Mediterranean notes. Note: Use 1/3 the amount |
The Essential Tools List
You don't need a professional kitchen for this, but a few specific tools make the process way smoother.
First, get a meat mallet. If you don't have one, a heavy rolling pin or even the bottom of a sturdy skillet works in a pinch. The goal is to flatten that thick end.
A cast iron skillet is my go to because it holds heat like a beast, but any oven safe baking dish will do. Most importantly, use an instant read meat thermometer. According to Serious Eats, pulling meat a few degrees before it hits the target temp prevents overcooking during the rest.
The step-by-step Cooking Flow
Let's crack on with the actual cooking. I like to divide this into a clear flow so you aren't rushing.
Phase 1: The Prep for Maximum Tenderness
- Place your chicken breasts between two sheets of parchment paper. Gently pound the thickest part with a meat mallet until the entire piece is an even thickness of approximately 3/4 inch. Note: This prevents the thin end from drying out.
- Pat the chicken breasts completely dry with paper towels. until the surface is matte and bone dry. Note: Moisture on the surface creates steam, which kills the browning process.
Phase 2: The Flavor Infusion
- In a small bowl, mash together the softened butter, minced garlic, paprika, salt, pepper, and parsley. Mix until a velvety paste forms.
- Generously spread the garlic butter mixture over the top and sides of each chicken breast. Press it firmly into the meat until fully coated.
Phase 3: The Rapid Roast
- Preheat your oven to 400°F (200°C). Grease your cast iron skillet or baking dish with olive oil until the bottom is slick.
- Place the coated chicken in the skillet. Bake for 18–22 minutes until the butter is mahogany gold and the internal temperature reaches 165°F (74°C).
Phase 4: The Essential Rest
- Transfer the chicken to a plate. Pour the remaining pan juices over the top until the meat is glistening.
- Let the meat rest for 5 minutes before slicing. Note: This is the hardest part, but it's where the juices settle.
Chef's Note: To get an even deeper crust, you can sear the chicken in the skillet for 2 minutes per side before putting the whole pan in the oven. It adds an extra layer of flavor but adds about 5 minutes to your time.
Avoiding Common Cooking Mistakes
The biggest issue people have with this Tender Garlic Chicken Breast is either burnt garlic or a rubbery texture. Both are easy to fix if you know what to look for.
Why Your Chicken Is Rubbery
This usually happens when you cook the meat too fast at too high a temperature, or you skip the pounding step. When the muscle fibers contract too quickly, they squeeze out all the liquid, leaving you with something that feels like a pencil eraser.
Why Garlic Burns
Garlic has a lower burn point than meat. If you're searing first and the pan is screaming hot, the minced garlic can turn black and bitter. Keeping the garlic folded into the butter paste protects it from direct heat.
| Problem | Root Cause | Solution |
|---|---|---|
| Dry edges | Uneven thickness | Pound to 3/4 inch consistently |
| Bitter taste | Burnt garlic | Mix garlic into butter, don't sauté alone |
| No browning | Wet chicken surface | Pat dry with paper towels before coating |
Quick Success Checklist
- ✓ Meat is pounded to a uniform 3/4 inch thickness
- ✓ Chicken is patted bone dry before buttering
- ✓ Oven is fully preheated to 400°F (200°C)
- ✓ Meat is pulled at 165°F (74°C) internal temp
- ✓ Meat has rested for at least 5 minutes
Customizing Your Garlic Chicken
If you're not in the mood for the classic version, you can easily tweak this. For a more intense flavor, I often add a pinch of cayenne pepper to the butter for a subtle heat.
For a dairy-free Swap
Use a high-quality vegan butter or a mixture of olive oil and a bit of nutritional yeast. It won't have the exact same velvety feel, but the garlic and paprika still carry the dish.
For a Creamy Garlic Twist
If you want something more indulgent, you can deglaze the pan after removing the chicken. Add a splash of white wine and a bit of heavy cream to the pan drippings, simmer for 2 minutes, and pour that over the sliced meat. If you love that style, you might also enjoy my Chicken Sauce for 4 recipe for other proteins.
For a Zesty Mediterranean Kick
Squeeze half a fresh lemon over the chicken immediately after it comes out of the oven. The acidity cuts through the richness of the butter and makes the garlic pop. If you prefer a faster, stovetop method for your garlic fix, check out this quick garlic chicken skillet.
Adjusting for More Guests
Scaling chicken is pretty straightforward, but you can't just double everything linearly without thinking about pan space.
Cooking for Two (Half Batch)
- Use a smaller 8 inch skillet.
- Reduce cooking time by about 20% (check temp at 15 minutes).
- Beat one egg if you're using a binder, then use half (not applicable here, but good for breading).
Cooking for a Crowd (2x-4x Batch)
- Work in batches. Do not crowd the pan, or the chicken will steam instead of roasting, and you'll lose that mahogany crust.
- Increase salt and paprika to 1.5x only. Over seasoning large batches can make the dish too salty.
- Reduce total liquid/oil by 10% as the collective moisture from more meat will fill the pan.
| Quantity | Pan Size | Temp Adjustment | Time Adjustment |
|---|---|---|---|
| 2 Breasts | 8 inch | None | -3 to 5 mins |
| 4 Breasts | 12 inch | None | Standard |
| 8 Breasts | 2 Pans | Lower 25°F | +5 to 10 mins |
Debunking Chicken Cooking Myths
I've seen a lot of "rules" floating around that just aren't true. Let's clear them up.
Myth: Searing seals in the juices. This is a huge one. Searing creates a crust for flavor and color, but it doesn't create a waterproof seal. Moisture loss happens throughout the cooking process regardless. The real secret to juiciness is the internal temperature and the rest period.
Myth: You must cook chicken until it's white all the way through. While safety is key, "white" isn't a scientific measurement. Use a thermometer. 165°F (74°C) is the gold standard for safety, but pulling it at 160°F and letting carryover cooking take it to 165°F during the rest is how you get that velvety texture.
Fresh Storage and Zero Waste
Don't let those delicious pan juices go to waste! That brown liquid in the skillet is concentrated flavor gold.
Storage Guidelines
- Fridge: Store in an airtight container for 3-4 days.
- Freezer: Wrap tightly in foil and plastic wrap for up to 2 months.
- Reheating: To avoid drying it out, reheat in a pan with a tablespoon of water or butter over medium low heat.
Zero Waste Tips If you have leftover pan drippings, don't wash them down the sink. Pour them into a small jar and use them as a base for a quick pan sauce or stir them into some mashed potatoes.
If you've got a few leftover pieces of this Tender Garlic Chicken Breast, shred them and toss them into a pasta or a salad the next day.
Serving and Plating Ideas
Since the chicken has a bold, rich look, you want sides that provide a bit of contrast.
I love serving this with a pile of steamed asparagus or a crisp arugula salad with a lemon vinaigrette. The bitterness of the greens balances the butter. If you're going for comfort, a side of garlic mashed potatoes or a wild rice pilaf works brilliantly.
When plating, slice the breast on a slight bias (diagonally). This shows off the juicy interior and creates more surface area for those pan juices to cling to. Garnish with a bit more fresh parsley for a pop of green that makes the mahogany gold crust really stand out.
Critical Sodium Level
1620 mg 1,620 mg of sodium per serving (70% 70% of daily value)
The American Heart Association recommends a daily limit of 2,300mg, with an ideal limit of 1,500mg for most adults to reduce the risk of cardiovascular disease.
Tips to Reduce Sodium
-
Reduce Added Salt-25%
The salt is the primary sodium driver here. Replace the 1 tsp of salt with a salt free seasoning blend or simply omit it entirely.
-
Add Fresh Citrus-15%
Squeeze fresh lemon or lime juice over the chicken before serving; the acidity mimics the taste of salt and brightens the flavor.
-
Boost Garlic Profile-10%
Increase the minced garlic to 6 cloves or add a pinch of garlic powder to enhance the savory depth without adding sodium.
-
Maximize Fresh Herbs
Double the amount of fresh parsley or add fresh thyme to provide aromatic complexity and flavor.
Recipe FAQs
How to make chicken breast extremely tender?
Pound the meat to a uniform 3/4 inch thickness. This prevents the thin edges from overcooking and drying out before the center reaches 165°F (74°C).
Is chicken breast good for hypertension?
Yes, lean proteins are generally recommended. To keep it heart healthy, simply reduce the amount of salt in the garlic butter rub.
What can I soak my chicken breast in to make it tender?
Skip the soak and use a fat-based rub instead. Spreading the garlic butter mixture over the meat creates a protective barrier that locks in juices during roasting.
Is chicken breast good for diabetics?
Yes, it is an excellent low-carb protein source. This recipe is naturally keto friendly since it relies on butter and garlic rather than sugary glazes.
How to cook a garlic butter chicken recipe?
Bake at 400°F (200°C) for 18 22 minutes. Coat the chicken in a paste of butter, garlic, and spices, then roast in a greased skillet until the crust is mahogany gold.
Is this a 5-minute meal?
No, it requires 35 minutes total. While prep is fast, the chicken needs 20 minutes to roast and 5 minutes to rest to ensure it stays juicy.
How to get a creamy texture without using heavy cream?
Mash softened butter and minced garlic into a velvety paste. This provides a rich, creamy mouthfeel and a gold crust using only the ingredients already in the recipe.
Tender Garlic Chicken Breast